Steeking my Philosopher's Wool Colour Your Own
Dear Blog-
A few days ago DH asked me if I had written to Blog lately, and I had to confess that I hadn't. I was too busy knitting and trying to finish my CYO before our guild meeting on Thursday. While I wasn't able to reach that goal - tho it was a danged cold morning that day and I sure could have put it to good use - it managed to spur me on to the point where I was so near to finishing it that I was done with the thing two days later. Yesterday, in fact. So I thought I would tell you day-by-day what I would have said had I been here.
Sunday - during and after our yard sale - I was knitting like a fiend, with the end of the body tube in sight. By afternoon I had finished the body tube and was ready to start steeking. I may have mentioned here before that I had a few issues with the PW pattern, and certainly the steek instructions fall into that category. But just for the heck of it I will tell you all my issues so far. I bought this kit a year ago at a workshop that Ann and Eugene from PW gave here in Tucson. I loved them, loved their way of doing business, and that hasn't changed. I also have their book 'Fair Isle Sweaters Simplified' and it gives a fair over-view of how they got started in the business, and also includes several of their patterns, with more detailed instructions than one gets in the kit, so if you are planning on working on one of their kits, get the book while you are at it.
My issues were that the shaping of the sweaters, IMNSVHO, is out of date. They have tighter ribbing at the bottom, a very ballooned-out sweater body, and then sleeves that are so long that they hang down over the cuff ribbing. All these were no problem at all to adjust, one just has to be aware that one needs to adjust them. I did, in fact, pretty early on in knitting the sweater body, have to rip out the thing and cast on again with more sts as I realized that the ribbing at the bottom was going to be way too tight. I refigured the ribbing sts at 80% of the body sts and started again. Because of the treatment I did at the button bands this worked out great, but if you are doing a simpler button band, do consider refiguring your ribbing sts at 90% of the body total. They also have as their ideal 16" of ease in the body. This, to me, is waaay too baggy and makes for an ill-fitting sweater, so again, take that into consideration when looking at your gauge and the pattern photos.
However, having adjusted these numbers to suit my taste, it was no problem making the sweater body. I find that the two-handed fair isle technique that they use is really rather easy to do. I have used it before, but in smaller projects, and I wasn't disappointed on this larger project. It knits up much faster than you would think - I started this on Xmas weekend.
In their instructions, they also advise you to have the start of your round placed at the side in the underarm area. Since I was planning a cardi, I moved my beginning of the round to the front steek area and this way I could get my rounds to move without the jump you get when knitting in the round with a pattern. I also added one extra stitch so that the pattern could mirror-image on either side of the steek. Little things like that are important to my eye and bug me when they don't match. Yes, I am the person who goes into other people's houses and adjusts the pictures that aren't hanging straight on the wall. When they aren't looking, of course.
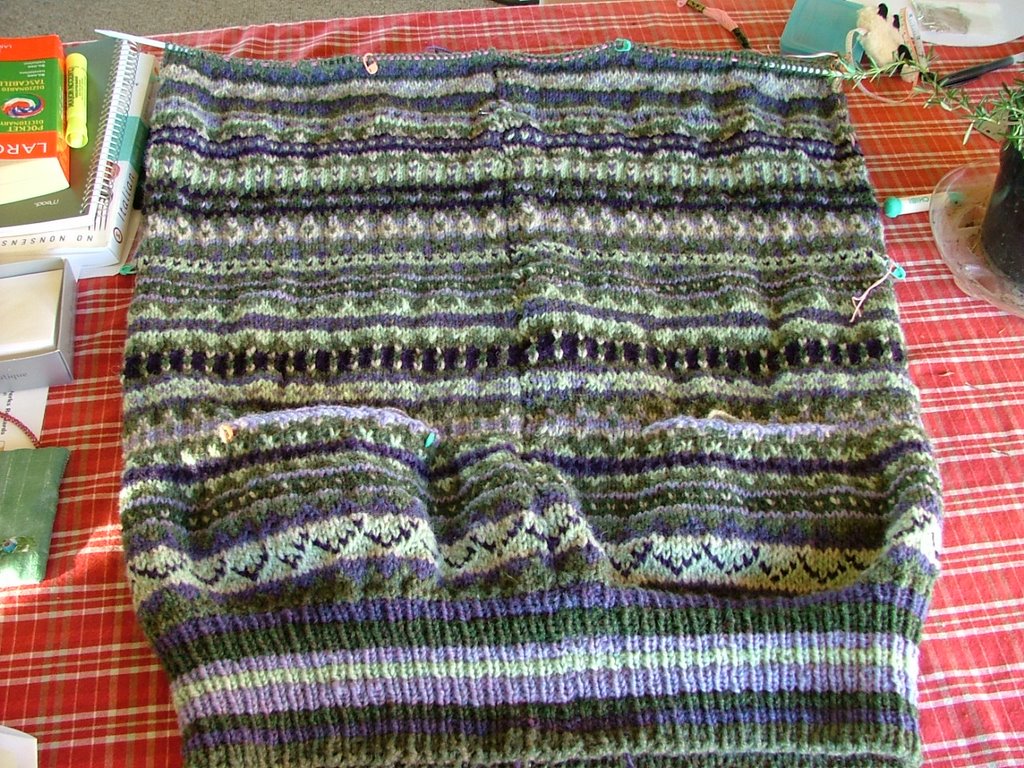
Here is my finished body tube pre-steeking:

Now then, where I made my mistake was in not researching steeking methods before starting the sweater. PW instructions direct you to cast on a single extra stitch to use as your steek. And this is what I did. It wasn't til I was near finishing the tube body that I started looking into steeking methods more thoroughly and realized the error of my ways. The best instructions that I found were here at the kidsknits website. Next time I do this I will cast on a 5 - 7 stitch steek for more playing room. On the other hand, had I done that here I would have run out of two colors of my yarn, so take that into consideration, too. I know you can get extra yarn by contacting PW. Another woman who bought a kit at the same workshop where I got mine tells me that she did run out of a couple of colors and was able to get more that way.
I debated long and hard on the wisdom of crocheted steeks vs. machine sewn steeks. There is such an elegance about the idea of a crocheted steek, like with like, and all that. Then there is the security of using the machine sewn method and knowing that beast isn't going to move. Since I decided in the end that I would use the kidsknits method of finishing my front bands, I went with the machine sewn steek. And I am glad I did. The same woman who ran out of yarn also used a crocheted steek, and she tells me that that her edges are not holding, and that she is waiting til she buys a sewing machine to secure her steeks that way before moving on.
Of course I have listened to the conversation over the years on the knitting lists about cutting your steeks and how scary that is. There is almost always mention of EZ's advice to take strong drink before and lay down in a dark room after. What a bunch of wimps, I thought. You know knitters have done this for hundreds of years at the least, and it works for them, why wouldn't you feel confident that it will work for you?
Well, let me tell you, sisters, they are right and more. I was nauseous the entire time I was sewing my steek reinforcements at the sewing machine. I was actually recalling awful memories from my childhood as I was sitting there sewing. Where the heck they came from, I don't know but they reared their heads as I sewed on my two weeks' worth of knitting in a state of terror and total lack of confidence.
I also had to figure out how to cut the area for my neckline, and what I did, I think, is pretty ingenious. After transferring my sts to two needles for front and back sts, I laid my piece flat on the table and counted out my stitches in thirds on the front. One third for one shoulder, the next third for the neckline, and the final third for the second shoulder. I placed markers at these points (and did the same for the back, to be used later). After making very sure that everything was laying flat, I then measure the distance across the neckline between the two center markers. It measured out to 9.5 inches. Ok, then I went to a piece of blank printer paper and measured a line 9.5 inches long, with a mark at the center at 4.25 inches. From that mark I measured 3.5 inches straight down in a perpendicular line. Next time I might go for a 3 inch deep neckline instead. Next I drew an arc from one end of the 9.5 inch line, down to the center point depth marking and back to the other end of the 9.5 inch line. And cut this out of the paper, using the piece I made as a pattern piece would be in sewing. I pinned it to the sweater body in the center, and basted around it in contrasting embroidery thread. This line is where I then sewed my neckline steek reinforcing stitches on the machine. Again, because I wasn't allowing for the finishing of edges in my calculations here, I would go for a less deep neckline next time, but other than that it worked perfectly and gave me a nice even neckline in the front.
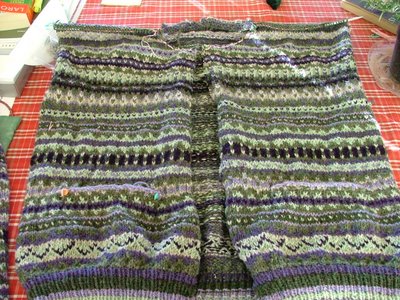
Then I sat down at the dining room table with my big ol' fabric sheers and cut that puppy open at front and armholes.
Here we are with all the steeks cut open.
 After doing all this I felt like I just couldn't look at knitting again for the rest of the day, so I set it all down and spent the evening reading and watching tv on the couch.
Next time I'll talk about finishing off the shoulders with a bind-off, and working the neck band.
Lynda
Sunday - during and after our yard sale - I was knitting like a fiend, with the end of the body tube in sight. By afternoon I had finished the body tube and was ready to start steeking. I may have mentioned here before that I had a few issues with the PW pattern, and certainly the steek instructions fall into that category. But just for the heck of it I will tell you all my issues so far. I bought this kit a year ago at a workshop that Ann and Eugene from PW gave here in Tucson. I loved them, loved their way of doing business, and that hasn't changed. I also have their book 'Fair Isle Sweaters Simplified' and it gives a fair over-view of how they got started in the business, and also includes several of their patterns, with more detailed instructions than one gets in the kit, so if you are planning on working on one of their kits, get the book while you are at it.
My issues were that the shaping of the sweaters, IMNSVHO, is out of date. They have tighter ribbing at the bottom, a very ballooned-out sweater body, and then sleeves that are so long that they hang down over the cuff ribbing. All these were no problem at all to adjust, one just has to be aware that one needs to adjust them. I did, in fact, pretty early on in knitting the sweater body, have to rip out the thing and cast on again with more sts as I realized that the ribbing at the bottom was going to be way too tight. I refigured the ribbing sts at 80% of the body sts and started again. Because of the treatment I did at the button bands this worked out great, but if you are doing a simpler button band, do consider refiguring your ribbing sts at 90% of the body total. They also have as their ideal 16" of ease in the body. This, to me, is waaay too baggy and makes for an ill-fitting sweater, so again, take that into consideration when looking at your gauge and the pattern photos.
However, having adjusted these numbers to suit my taste, it was no problem making the sweater body. I find that the two-handed fair isle technique that they use is really rather easy to do. I have used it before, but in smaller projects, and I wasn't disappointed on this larger project. It knits up much faster than you would think - I started this on Xmas weekend.
In their instructions, they also advise you to have the start of your round placed at the side in the underarm area. Since I was planning a cardi, I moved my beginning of the round to the front steek area and this way I could get my rounds to move without the jump you get when knitting in the round with a pattern. I also added one extra stitch so that the pattern could mirror-image on either side of the steek. Little things like that are important to my eye and bug me when they don't match. Yes, I am the person who goes into other people's houses and adjusts the pictures that aren't hanging straight on the wall. When they aren't looking, of course.
Here is my finished body tube pre-steeking:
Now then, where I made my mistake was in not researching steeking methods before starting the sweater. PW instructions direct you to cast on a single extra stitch to use as your steek. And this is what I did. It wasn't til I was near finishing the tube body that I started looking into steeking methods more thoroughly and realized the error of my ways. The best instructions that I found were here at the kidsknits website. Next time I do this I will cast on a 5 - 7 stitch steek for more playing room. On the other hand, had I done that here I would have run out of two colors of my yarn, so take that into consideration, too. I know you can get extra yarn by contacting PW. Another woman who bought a kit at the same workshop where I got mine tells me that she did run out of a couple of colors and was able to get more that way.
I debated long and hard on the wisdom of crocheted steeks vs. machine sewn steeks. There is such an elegance about the idea of a crocheted steek, like with like, and all that. Then there is the security of using the machine sewn method and knowing that beast isn't going to move. Since I decided in the end that I would use the kidsknits method of finishing my front bands, I went with the machine sewn steek. And I am glad I did. The same woman who ran out of yarn also used a crocheted steek, and she tells me that that her edges are not holding, and that she is waiting til she buys a sewing machine to secure her steeks that way before moving on.
Of course I have listened to the conversation over the years on the knitting lists about cutting your steeks and how scary that is. There is almost always mention of EZ's advice to take strong drink before and lay down in a dark room after. What a bunch of wimps, I thought. You know knitters have done this for hundreds of years at the least, and it works for them, why wouldn't you feel confident that it will work for you?
Well, let me tell you, sisters, they are right and more. I was nauseous the entire time I was sewing my steek reinforcements at the sewing machine. I was actually recalling awful memories from my childhood as I was sitting there sewing. Where the heck they came from, I don't know but they reared their heads as I sewed on my two weeks' worth of knitting in a state of terror and total lack of confidence.
I also had to figure out how to cut the area for my neckline, and what I did, I think, is pretty ingenious. After transferring my sts to two needles for front and back sts, I laid my piece flat on the table and counted out my stitches in thirds on the front. One third for one shoulder, the next third for the neckline, and the final third for the second shoulder. I placed markers at these points (and did the same for the back, to be used later). After making very sure that everything was laying flat, I then measure the distance across the neckline between the two center markers. It measured out to 9.5 inches. Ok, then I went to a piece of blank printer paper and measured a line 9.5 inches long, with a mark at the center at 4.25 inches. From that mark I measured 3.5 inches straight down in a perpendicular line. Next time I might go for a 3 inch deep neckline instead. Next I drew an arc from one end of the 9.5 inch line, down to the center point depth marking and back to the other end of the 9.5 inch line. And cut this out of the paper, using the piece I made as a pattern piece would be in sewing. I pinned it to the sweater body in the center, and basted around it in contrasting embroidery thread. This line is where I then sewed my neckline steek reinforcing stitches on the machine. Again, because I wasn't allowing for the finishing of edges in my calculations here, I would go for a less deep neckline next time, but other than that it worked perfectly and gave me a nice even neckline in the front.
Then I sat down at the dining room table with my big ol' fabric sheers and cut that puppy open at front and armholes.
Here we are with all the steeks cut open.
 After doing all this I felt like I just couldn't look at knitting again for the rest of the day, so I set it all down and spent the evening reading and watching tv on the couch.
 Next time I'll talk about finishing off the shoulders with a bind-off, and working the neck band.
Lynda
posted by Lynda Michaluk Sorenson at 7:39 AM
![]()
![]()

0 Comments:
Post a Comment
<< Home